When you buy used tires you can often save more than 55% of the original price. However, safety should be considered first and price second. Since there is little government regulation on second hand tires, it is buyer beware. There are plenty of places out there that will sell you bald tires. You must be able to assess the quality of the tire, the mileage left in it, and how well it matches your other tires. In this article I will address how to inspect a used tire for safety.
No matter the vehicle type, such as car, truck, or motorcycle…It is critical to pick out a used tire that meets at least the minimum specifications for your vehicle. This includes the size, load rating, and speed index. You can find these requirements inside your vehicles owners manual or on a sticker on the inside panel of your drivers side door. Once you know the correct tire specifications you need, its time find used tires that are safe to drive on. There are basic legal guidelines tires must meet to be considered safe, but these are not enforced in the secondary tire market very well.
The 3 Key Areas to Check When You Inspect a Used Tire
When you inspect a used tire to ensure it is safe, there are 3 key areas to focus on:
- Tread
- Sidewall
- Bead
Those 3 areas make up most of the tire and you will then use your judgement in conjuntion with the overall tires health to determine the condition.
Inspecting The Tires Tread
A tires tread refers to the circumference of the tire that makes direct contact with the road. The tread pattern are the carved rubber groves in the tread that create the grip and traction. As tires are used and exposed to heat through driving, the tread is worn out and reduces its ability to provide traction.
The first step in evaluating the condition and safety of a used tire is to assess several factors all relating to the tread. Here is what you should look for…
Tread Depth
There are two ways to evaluate the depth of the tread. You can use a tread depth gauge for a more precise depth measurement or you can use a penny for a laymens measurement. For most people measuring tread depth with a penny will suffice. Here is how you do it.
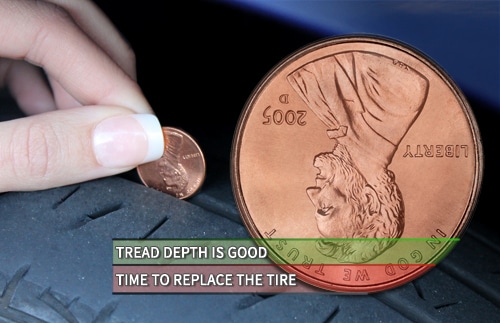
Penny Tread Depth Test:
- Flip the penny upside down so Lincoln’s head is down
- Place the upside down penny inside each of the tire’s tread grooves
- Check to see if you see Lincoln’s head from any of the grooves
- If his head is visible from any of the grooves the tread is legally bald
Using a Gauge
If you are using an actual measurement tool like a tread depth gauge or a measure tape, follow this guideline:
- -0 – 3/32nds (Dangerous, do not buy)
- 3/32 – 6/32nds (Warning: Be Careful When Driving, Need To Be Replaced for snow or rain)
- 6/32 – 32/32nds (Tire Safe)
How Much Life is Left
To test and see how how much tread is left compared to its original tread depth you need a set of calipers. New car tires start around 10/32 of an inch and truck tires vary, but start around 12-14/32 of an inch. If you are doing your research you can contact the manufacturer to confirm the starting tread measurement and compare that to your caliper measurement. Then once you figure out the percentage of tread left you can apply the same percentage to the predicted mileage of the tire.
Legally Bald
In most states tires are considered “bald” from a legal perspective when the tread depth falls below 2/32 of an inch.
Tread Width
Tread Width is measured from shoulder to shoulder of the tire. To better understand what causes uneven tread wear on the outer edge is positive camber, caster and toe as well as over-enthusiastic cornering. Inner edge tread wear is often due to negative toe and camber. The inner edge os one of the most common tread wear issues you will see. There isn’t an established standard to measure tread width and manufacturers all follow a different method. There are fancy tools out there to measure a tires tread width, but my opinion is that you can eyeball it.
To see the tread width you face the tire in front of you so that the tire is perpendicular to your body. Now compare one shoulder on the outside of the tire to the shoulder on the inside. You want to assess if the wear looks even on both sides. If the widths are uneven it is because how the tires were aligned and balanced when their were used.
Tires with even widths on the treads have better traction as their will be more contact with the road.
Feathering
Related to the tread width is feathering which is the result of excessive positive or negative toe angle and uneven alignment. To identify feathering feel around the edge tires circumference to make sure it is smooth. If some parts feel smooth and some parts feel like they are catching, that is feathering.
Exposed Chords
Look carefully at the tread surface all around. Irregular wear can expose braided steel cords from inside the tire to pierce through the outside tread. If you can see ANY chords or even a few thin steel wires coming out of the tread, the tire is dangerous.
Flat Spots
Flat spots appear on a tread when a car has been sitting for a long time. If you are getting tires at a salvage yard, you will see many tires with flat spots, since many of the vehicles are junked due to being inoperable. To look for flat spots, you can feel around the circumference for anything that feels flat and deviates from the circular shape.
A tire with a bad flat spot will cause a vehicle to vibrate and are particularly dangerous in rain and snow.
Cupping
Cupping is the result of insufficient ride suspension when the tire was on the previous vehicle. It will cause your ride to be noisy. To identify cupping run your hand across the tread of the tire and feel for bumps or waves.
Running on cupped tires is unsafe, particularly if your tread depth is below 4/32 of an inch. If the tread depth is thick enough, the tire will eventually smooth out as you drive on it.
Cracking
Tires get cracks because they are made of rubber. Rubber gets brittle and/or dries up and cracks when exposed over time and poor weather conditions. There are different levels of tire cracks: major and minor. You need to look for both on the inside and the outside of the treads.
A major crack affects the structure of the tire. These will be like an enormous crack in the circumference or even the sidewall. Minor cracks are visible inside of the tread. These are the result of weather and aging.
Inspecting The Tires Sidewall
The sidewall is the smooth rubber vertical surface on the side of the tire. It is the area from the edge of the tread and the bead. The sidewall provides lateral stability, prevents air from escaping, and keeps the body plies protected. Here are the main points you should on the sidewall to consider when you inspect a used tire.
Belt Separation
Look closely at the sidewall and tread surface for bumps, waviness or other irregularities that might indicate an impact that has caused the rubber to pull away from the steel belts. You can often feel changes in the rubber surface by running your hands over the sidewall and tread surface even if the irregularity is not obvious when the tire is not inflated.
Linear Damage
Look inside the tire at the inner liner for damage and/or exposed cords. When a tire begins losing air, the sidewalls begin to collapse. At some point, the collapsing sidewalls will fold over and begin to rub against themselves. This process will scrub the rubber liner off the inside of the sidewalls until the sidewall is damaged beyond repair. If you can see a “stripe” of wear circling around the sidewall of the tire that is softer to the touch than the rest of the sidewall, or if you find “rubber dust”, small particles of rubber inside, or if the sidewall has been worn away until you can see the inner structure, stay away from that tire, as it is unsafe.
Inspecting The Tire Bead
The bead is a rubber-coated steel cable that is in direct contact with the wheel rim. Its purpose is to ensure that the tire remains attached to the wheel rim with a tight seal. Here is what you should look for when evaluating the bead…
Bead Chunking
Look closely at the bead areas, the two thick rings of rubber where the tire contacts the wheel. You’re looking especially for chunks of rubber missing from the beads, or other damage that can prevent the tire from sealing correctly. Bead chunking causes the tire to sit loose on the rim and could be dangerous.
Inspect a Used Tire for Overall Health
The overall health of the tire is an all encompassing evaluation of the tires condition. Here you want to inspect a used tire for its strength and ability to provide a safe and comfortable ride. Here is what I look for in the overall health of a tire…
Aging
Tires deteriorate from the inside out, which means only examining the exterior doesn’t tell you everything. To start you can feel the sides of the tire to see if the rubber is drying out. Dried out rubber loses traction and is dangerous on wet or snowy roads.
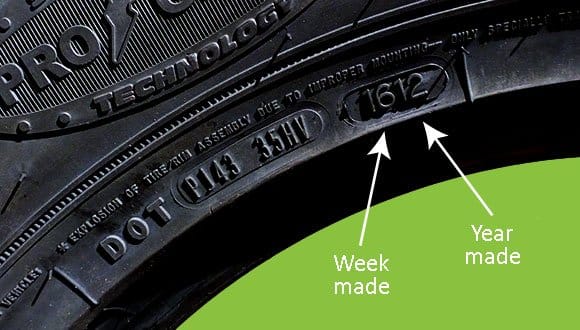
To get the actual age of the tire, look for the letters DOT on the sidewall, this is called the TIN (Tire Identification Number). The last four digits in the sequence are the week and year the tire was manufactured. So if the last four digits of the DOT says “3008”, this means the tire was made on the 30th week of 2008. NEVER buy a tire more than 6 years old. Even an old tire with great tread depth is considered dangerous, because old rubber loses traction.
The trouble with depending on the TIN to determine tire age is that used tire recyclers and retailers have been known to scrub the number off, which means you need to know how to feel for old rubber. Examine the sidewall and tread for cracks at flex points on the sidewall or between tread blocks. These are indications that dry rot is setting in.
Another good thing you can do with the TIN if its still on the tire is check for manufacturer recalls.
Improper Repairs
Definitely look for punctures in the tire, but also look inside and out for punctures that have been repaired. A proper repair is a full patch on the inside of the tire. Plugs are not inherently unsafe, but patches are much safer. Plugs can be DIY jobs with a repair kit, so you never know who did it. Definitely avoid large punctures or repaired punctures located within an inch of either sidewall. I typically avoid plugged or patched tires all together.
Wobbling
Pick up the tire and roll it to see if it has any wobble to it or rolls in an awkward manner. If the tire is wobbly you should avoid it because it is unsafe.
Inspect a Used Tire for Safety – Conclusion
No matter where you decide to find used tires, there are many points to consider when you inspect a used tire for safety. Don’t let the heavily discounted price cloud your judgment and sacrifice your well being to save a few dollars. The benefits of buying used over new is great, but there are no safety regulations in most states to protect you. Additionally you need to be aware of a few used tire tricks and scams that some vendors try and pull. If you follow the advice above, you should be able to purchase used tires in good condition and get a lot of mileage out of them.